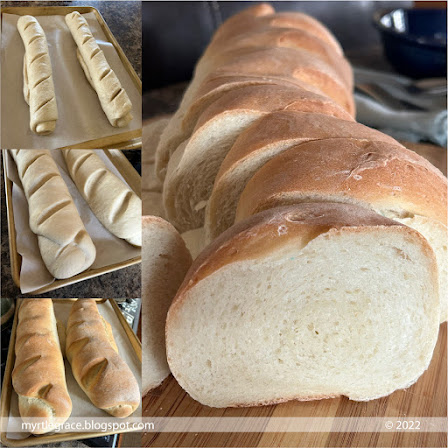
Homemade bread is always better than store bought - it's also pretty easy to make. This recipe was so simple to put together. I love my Nutramill mixer that kneads the dough perfectly. The kids were off school so I had B turn the machine on every 10 minutes for an hour to get it rising with Method 1. This recipes has you rolling out the dough flat then rolling up each half to make the loaf. I've decided I really like the vegetable spray method vs. the floured surface method for rolling. Basically you spray your surface and rolling pin and you don't add flour and make as much of a mess. Sure you wash off your counter, but it actually does seem to work better, in my opinion... Also when you roll up the actually loaf the layers stick together, rather than flour that might slip. These loaves rose a LOT and baked up beautiful. The slices were the perfect bite with dinner. Either with butter or dipped into our stew. And left overs? If there are any, will be perfect as French Toast.
Easy Homemade French Bread
2 ¼ cups warm water
2 tablespoons sugar
1 tablespoon instant or active dry yeast
¾ tablespoon salt
2 tablespoons olive oil
5 ½ – 6 cups (781 – 852 g) all-purpose flour or bread flour
In the bowl of an electric stand mixer fitted with the dough hook, combine the water sugar and yeast. If using active dry yeast, let the mixture bubble and foam before proceeding (this can take 3-5 minutes). If using instant yeast, proceed with the recipe (no need to let the yeast activate).
Add the salt, oil and 3 cups of flour and mix. Add in 2 1/2 to 3 more cups of flour gradually. The dough should clear the sides of the bowl and form a soft ball that doesn’t leave a lot of dough residue on your fingers. Knead for 2-3 minutes until the dough is smooth. If the dough starts to cling to the sides of the bowl (or the center column if using a Bosch or other mixer with a center), add 1/4 cup of flour at a time until a sturdy but soft ball of dough forms.
Rising Method 1: Leave the dough in the mixer, cover with a lid or towel, and let the dough rest for 10 minutes. Stir it down by turning on the mixer for 10 seconds or so. Repeat the "rest and stir down" cycle five more times.
Rising Method 2: Instead of letting the dough rest for 10 minute spurts and then stirring it down, transfer the dough to a lightly greased bowl and cover with a towel or greased plastic wrap. Let the dough rise until doubled, about an hour or so, depending on the warmth of your kitchen.
Turn the dough onto a lightly greased surface and divide in half. Pat each section into a thick rectangle, 9X13-inches or thereabouts (doesn’t have to be exact). Roll the dough up starting from the long edge, pressing out any air bubbles or seams with the heel of your hand, and pinch the edge to seal. Arrange seam side down on a large baking sheet lined with parchment paper (I use separate baking sheets for each loaf). You can slash several gashes in the top of the bread now or wait until after it has risen (to avoid the risk of the bread deflating, especially if you don’t have a very sharp razor or knife, slash now – see pictures above in the post for a visual).
Cover with greased plastic wrap or a kitchen towel, and let the loaves rise until noticeably puffy and nearly doubled in size, about an hour.
Preheat the oven to 375 degrees F and make sure an oven rack is in the center position. If you haven’t already, with a very sharp knife or baker’s lame cut several gashes at an angle on the top of each loaf.
Optional: Place the baking sheet in the hot oven and immediately toss 3-4 ice cubes on a baking pan in the oven below the bread. Close the oven door quickly.
Bake for 25-30 minutes until golden and baked through. Remove from the oven and slather with melted butter . Repeat with the 2nd loaf (or if you have convection setting, the loaves can bake at the same time, just rotate the baking sheets halfway through baking).


No comments:
Post a Comment